How to migrate your WordPress website to another server without Plugin [2024]
![How to migrate your WordPress website to another server without Plugin [2024]](/_next/image?url=https%3A%2F%2Fcdn.hashnode.com%2Fres%2Fhashnode%2Fimage%2Funsplash%2F-WPrNEM_6dg%2Fupload%2Fv1652618787310%2FAN3GTEYK7.jpeg&w=3840&q=75)
DS/ML| WordPress Developer| Blockchain Enthusiast| Building web apps and writing Machine Learning models ❤⚡
Migrating a WordPress website to a new server is a common task for website owners and administrators. While there are plugins available to assist with this process, some prefer to perform the migration manually for greater control and understanding of the steps involved. In this guide, we will walk through the process of migrating a WordPress website to another server without the use of plugins, providing a clear and detailed approach for a successful transfer.
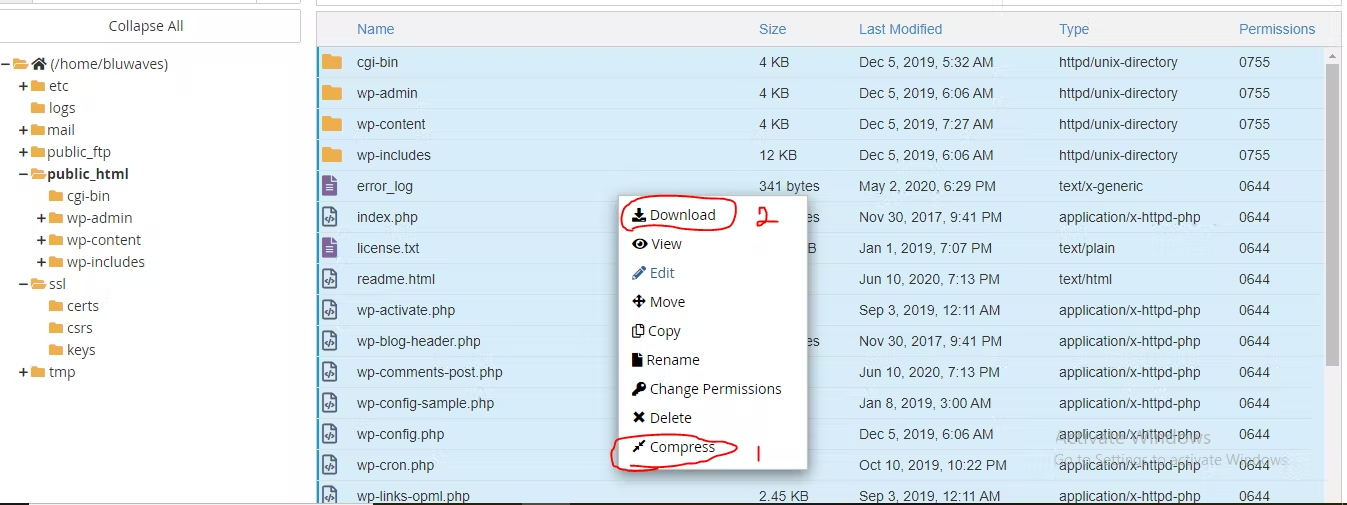
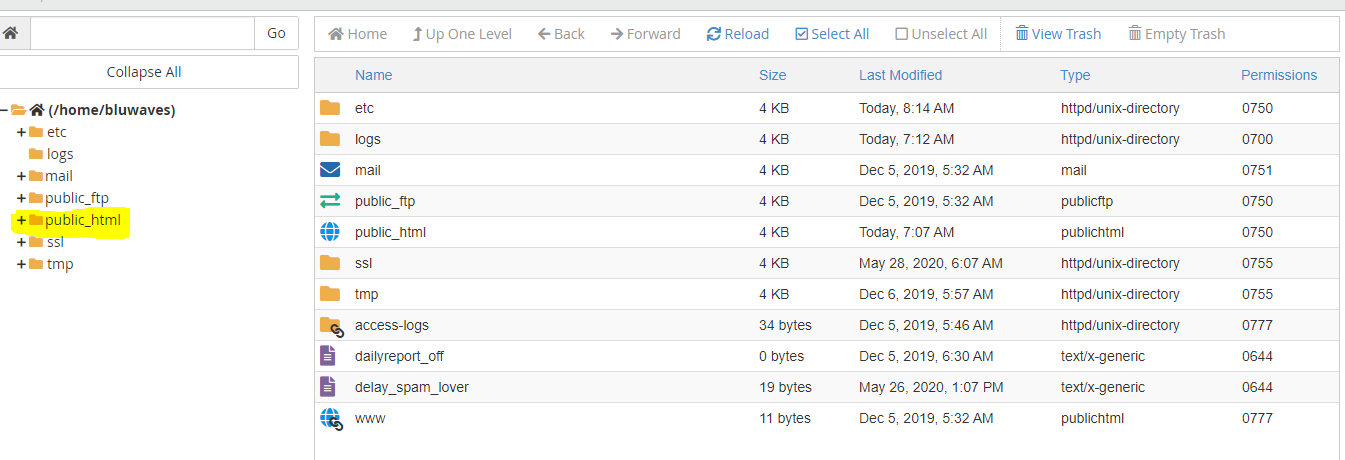
Login to your Cpanel and navigate to your File Manager. Select all files you see in the directory of the website. You can find the website file in public_html if you are just running a single website on the server or with the name of the website.
Compress and download to your local computer.
Navigate to Phpmyadmin on your Cpanel and select the database name. Click the export button and Go to get the database on your computer.
Ya, almost done.
Now , you have successfully backed up your website on your local computer. We will be focusing on how to restore it back in the next section.
Navigate to your File Manager and upload back the file you downloaded, make sure you extract it after uploading successfully.
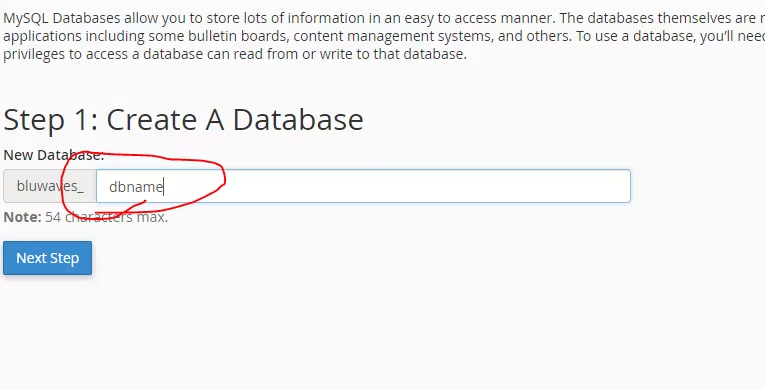
Go to your database section in your Cpanel and click MySQL Database Wizard Create a database name. Use a name that you can use to identify your db
Create a database username and password.
Now, you need to set database privilege, make sure you check only boxes you will be needing (security wise).

Go back to your PhpmyAdmin and click the database you created, Click import and import the SQL you backup before now.

Ya, welcome to the final stage, we just need to connect our database to our website file.
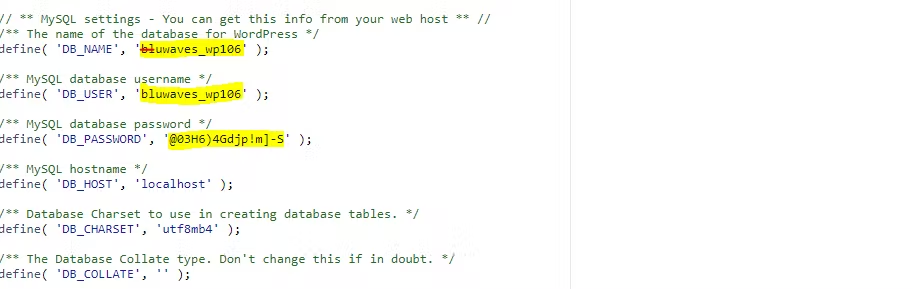
Check your website files and locate a filename wp-config.php. Scroll to where you see the DBname, DB username and password and replace with the one we just created.
Boom! Our website is live. But that is not the end.
In cases where the new server has a completely different website URL, it becomes imperative to update the site configuration to reflect this change accurately. This article provides a concise guide on updating the website URL during migration, focusing on WordPress websites.
Step 1: Accessing the Database The first step in the process is to access the website's database. For WordPress websites, this typically involves using a tool like phpMyAdmin or a similar database management interface. Once logged in to the database, locate the 'wp_options' table. This table stores essential configuration settings for the WordPress site.
Step 2: Updating the Site URL Within the 'wp_options' table, there are two critical fields that need to be updated: 'siteurl' and 'home'. These fields store the website's base URL. Update both fields with the new website URL. This ensures that all internal links and references point to the correct location after migration.
Step 3: Updating the Administrator Email While in the 'wp_options' table, it is also advisable to update the administrator email address. This can be found in the 'admin_email' field. Updating this email ensures that notifications and important site messages are sent to the correct address post-migration.
Step 4: Resaving Permalinks After updating the necessary fields in the 'wp_options' table, the next step is to log in to the WordPress Dashboard. Once logged in, navigate to the 'Permalinks' settings page. Simply re-saving the permalink settings will refresh the website's URL structure, ensuring that all links within the site are updated to the new URL format.
By following the steps outlined in this guide, you can confidently migrate your WordPress website to a new server without relying on plugins. This manual approach provides a deeper understanding of the migration process and allows for greater control over each step.


